This post is on How to Fix Steam Game Won’t Launch Issue.
Are you having trouble getting your Steam game to launch?
It happens to the best of us.
No matter how much time or money we spend on our favorite games, sometimes they just won’t run.
If this is a problem you are facing…
Don’t worry – I’m here to help.
In this article, I’ll show you exactly what to do when your Steam game won’t launch so that you can get back in the action as soon as possible!
I know it’s frustrating when something like this happens, but with my step-by-step guide and troubleshooting tips…
…you’ll be able to solve any issue preventing your Steam game from launching quickly and easily.
So let’s jump right into it and find out what steps you need to take!
Table of Contents
How to Fix Steam Game Won’t Launch Issue
It’s most likely a pretty annoying issue, but don’t worry, there are plenty of tips and tricks that can help you out.
In this article, I’ll show you how to fix the “Steam Game Won’t Launch” issue.
From changing the security settings in your computer to updating device drivers and more, I’m sure I have something that will work for you!
Check Video Game Requirements
Hey folks, if you’re having trouble getting a steam game to launch, the first thing I’d recommend is checking the video game minimum system requirements.
Nowadays there’s all kinds of specs that games need in order for them to run properly.
It might be something as simple as needing more RAM or an extra hard drive space—things like that.
If that check doesn’t do it and you still can’t get your game running, don’t worry!
There are plenty of other options before you give up hope.
One quick fix could be restarting your computer…
Restart Your Computer
My jaw dropped when I first heard that restarting your computer could help fix a steam game that won’t launch.
It’s not rocket science, but it feels like it!
I mean, who would have thought that something as simple as rebooting your machine could make all the difference?
But believe me – it can be an absolute lifesaver.
Restarting your computer clears out any temporary files or processes and helps Steam to sync up with the server properly.
Plus, if there are any software glitches on your end, this should take care of them too.
So don’t hesitate – just press the reset button and give yourself (and Steam) a fresh start.
Who knows?
You might find yourself enjoying the game in no time at all!
Force-Quit Steam Game
When you’ve tried everything else, it might be time to pull out the big guns.
If a steam game won’t launch and all other solutions have failed, then force-quitting the game could be your last resort.
It’s like cutting off your nose to spite your face: risky business that can backfire if done wrong.
First thing first – close down any applications running in the background, including Steam itself.
Then open up Task Manager (Ctrl+Alt+Delete) and manually end tasks related to the game that won’t launch.
This will free up resources for whatever is causing the problem so you can hopefully get things going again.
TIP: Keep an eye on Task Manager during this process as some games might relaunch themselves automatically!
Play In Offline Mode
If all else fails, you can always try playing in offline mode.
It’s the nuclear option since it means no online gaming, but at least you’ll have access to single-player games.
You never know; maybe this could be a blessing in disguise!
I mean, think of all the time and money you’ll save by not having to buy or download anything new.
Offline mode also has its own set of benefits—you won’t get interrupted during your game!
No more calls from friends begging for help on their levels—it’s just you, your controller (or keyboard), and that sweet feeling of accomplishment when you beat a level without assistance.
Plus, some people find they actually play better when there are no distractions around them.
So if nothing else works out with getting your Steam game up and running again, then why not give offline mode a shot?
Who knows – it could become one of your favorite ways to play!
Move The Game To A Different Location
Moving your game to a different location could be the solution you need.
After all, sometimes when something gets stuck in one place and won’t budge, it helps to move it around.
It’s like trying to get an old car started—you can always try tapping on its hood or jiggling the wires in hopes of getting it going again.
Similarly, moving your steam game to another folder may help get things unstuck and running smoothly again.
Here are some tips that might help:
- Uninstall the game from your current location, then reinstall it somewhere else.
- This will give it a fresh start, which may solve any underlying issues causing you trouble with launching the game.
- Check if there is enough space for the game – make sure you have minimum free storage before installing.
- Make sure you have the correct permissions set up for this new location as well.
- Move only certain files associated with the game instead:
- If uninstalling and reinstalling isn’t possible or preferred, you can try transferring just the specific files related to that particular game.
- This includes configuration and save files found within My Documents/My Games (or wherever they’re located).
- Doing so should keep intact other games or applications installed in their original locations without disrupting anything else unnecessarily.
- These tips may come in handy next time you run into similar problems with other games too!
When considering relocation as an option, remember that there are many ways to go about making the switch – choose what works best for you given your circumstances and resources available.
With that being said, restarting the Steam client could also be worth exploring…
Restart The Steam Client
If your steam game won’t launch, you need to take action.
And fast!
One step is to restart the Steam client. But that’s not all. There are more steps that can help you get back in the game.
First off: Restarting the Steam client refreshes its connection with the server and may fix any minor issues preventing it from launching properly.
To do this, simply quit out of the app totally and then open it again.
That’s it! Plus, if you’re stuck on a loading screen or your computer seems to be lagging for no reason, reloading Steam could well be the solution – so don’t overlook it as an option.
Clear The Steam Download Game Cache Files
Over time, the files used to launch your Steam games can become corrupted.
That’s why it’s important to periodically clear out your game cache – think of it like cleaning out a dusty room in an old house that needs some TLC.
If you’ve been having trouble launching Steam games, then clearing the download cache could be just what you need.
To do this is simple:
#Step 1: Just open up your Steam client and head over to “Settings -> Downloads -> Clear Download Cache”.

#Step 2: Then Click OK.
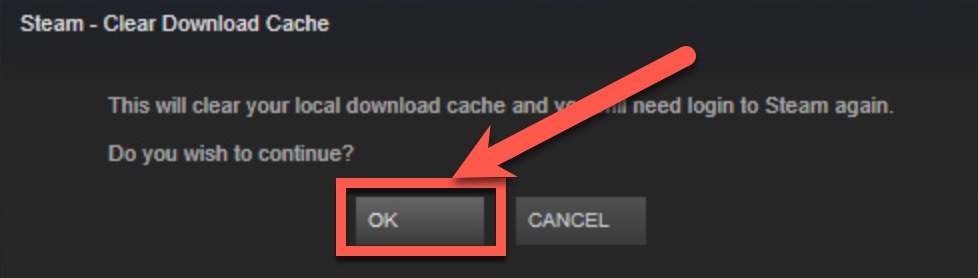
This will force the game assets to reinstall from scratch – hopefully restoring them back into working order!
Sometimes fixing things doesn’t have to be complicated; by taking a few simple but effective steps such as clearing the download cache for your Steam games, you may find yourself happily playing along again in no time.
The next step?
Verifying the integrity of those same Steam games so they stay running smoothly.
Verify Steam Game Integrity Files
Verifying your Steam game’s integrity is an important step if the game won’t launch.
It ensures that all of the necessary files and components are in place, so you can be confident that everything should work properly.
Verifying the integrity of game files on Steam is a simple process.
To get started:
- Restart your computer and launch Steam.
- Then, click the Library tab at the top of the Steam window.
- Right-click either Vermintide 2 or Darktide in your Steam library sidebar and select Properties.
- Select the Local files tab and click Verify integrity of game files.
- Steam will then check the game’s files and repair any that are corrupt or missing.
- Once complete, you should be able to play the game without any issues.
Once these steps have been completed.
It’s time to move on to removing or transferring the ‘gameoverlayrenderer64.dll’ file – another very common issue when it comes to troubleshooting Steam games that won’t launch.
Remove/Transfer The Gameoverlayrenderer64.Dll File
Now, let’s move onto the next step. You may need to remove or transfer the gameoverlayrenderer64.dll file in order to fix your steam game not launching issue.
This is a crucial yet simple process which you have to go through if nothing else works.
You can try transferring this file from another source and then paste it into the directory where your Steam games are installed.
If that doesn’t work, delete the existing one and replace it with a new copy of the same file obtained from another computer.
I recommend restarting your computer after making changes as always for good measure before trying out other solutions mentioned here.
Check For Problematic Applications
So you’ve tried all the usual tricks, and that pesky Steam game still won’t launch?
It’s time to go beyond the obvious fixes.
After all, this isn’t your first rodeo with troublesome software.
Let’s check for any applications or problematic games that may be causing a conflict: it just might be the secret ingredient we need!
First off, let’s look at what other programs are running in the background while trying to launch our game.
If there’s anything non-essential open – like a video streaming service or chat program – close it down right away.
You don’t want these apps taking up precious resources when playing games on Steam.
Also keep an eye out for any “helper” programs which can interfere with gaming performance; some of these can even prevent a game from launching altogether.
So if you see something suspicious (or simply unnecessary), shut it down!
Update drivers regularly too – they’re essential for smooth gaming experiences – and make sure Windows is completely up-to-date so everything runs optimally.
With luck, one of these steps will have solved our problem…if not, then it’s time to try disabling third-party antivirus software…
Disable Third-Party Antivirus Software
So, you thought that disabling problematic games was the solution to your steam game not launching?
Ironic isn’t it?
Well, let’s move on and look at another possible fix – disable third-party antivirus software.
It may seem counterintuitive to turn off a program designed for keeping us safe from malicious apps and threats but in some cases, these programs can clash with Steam or other games’ files leading to issues like this one.
So if turning off the problem application didn’t work, try disabling any third-party antivirus software temporarily while you play your game.
Afterward, don’t forget to re-enable the security measures! This could do the trick; however, if it doesn’t then keep reading as there are more steps we can take.
Apply Pending Updates
Applying pending updates is the next step to take if your steam game won’t launch.
This will ensure that any issues with the software have been addressed and can help solve other problems you may be having.
Here are five key things to consider when applying those updates:
- Check for Steam updates: Make sure the client itself is up-to-date so it’s running on the most recent version of its software.
- Update individual games: You’ll need to open each game in your library and check for available patches or fixes.
- Look out for driver updates: If an update requires a graphics card or other hardware drivers, they must also be downloaded and installed first before attempting to run the game again.
- Wait until all downloads finish – Don’t try launching the game until everything has finished downloading and installing properly.
- Restart your computer after updating: A reboot allows Windows, macOS, or Linux to clear memory caches, close background processes, and start fresh with new settings from updated files.
Taking these steps should give you some peace of mind knowing that everything’s been taken care of before trying to get your game working again.
But if this doesn’t work, there might still be something else wrong – let’s move on to looking at another potential solution…
Run The Game As an Administrator
As you approach the finale of your quest to get that steam game up and running, take a deep breath.
You’ve come so far and this step can be the difference between success or failure.
Here’s how to run the game as an administrator – easy peasy!
First off, locate the shortcut for your game from its installation folder on Steam.
Then, right-click it and select ‘Run as Administrator’ from the context menu.
With any luck, your game should launch properly after doing this.
If not, then there might be other steps that need to be taken in order to make sure everything is working correctly.
The good news is that most games are designed with built-in administrative features like these – allowing them to operate without issues when they’re launched with elevated privileges.
So if you follow these instructions carefully, chances are high that you’ll have no problem playing your favorite steam game soon enough!
Ready for the next challenge?
Let’s see what happens when we try running it in compatibility mode…
Run The Game In Compatibility Mode
Running the game in compatibility mode is another way to try and get it to launch.
It may be that your operating system isn’t compatible with the specs of the game or you have an outdated version of a program needed for the game to run.
To address this, running the game in compatibility mode can help:
How to Run The Game In Compatibility Mode on Windows?
- Open Steam and navigate to the game you want to run in compatibility mode.
- Right-click on the game and select Properties.
- Go to the Compatibility tab and check the box for “Run this program in compatibility mode”.
- Choose the operating system you need to run the game in compatibility mode for.
- Click Apply and then Ok.
- If necessary, open the game folder, set the compatibility mode for the game executable, and run it from within Steam.
How to Run The Game In Compatibility Mode on Mac?
- Open Steam and navigate to the game you want to run in compatibility mode.
- Right-click on steam.exe (or binsteamwebhelper.exe) and select Properties.
- Go to the Compatibility tab and check the box for “Run this program in compatibility mode”.
- Choose the operating system you need to run the game in compatibility mode for.
- Click Apply and then Ok.
- If necessary, open the game folder, set the compatibility mode for the game executable, and run it from within Steam.
By running your Steam game in compatibility mode, you’re essentially tricking your computer into thinking its an older version than what it actually is.
This technique will often solve most issues related to launching games on Steam, but if not, then updating Windows or macOS could be necessary next.
Automatically Repair Windows Errors
Automatically repairing Windows errors can help solve a Steam game won’t launch issue.
You can Automatically Repair Windows Errors by following the steps below:
- Insert a Windows bootable disk and boot from it.
- Click Repair your computer > Troubleshoot > Advanced Options.
- Perform a hard reboot by pressing and holding the power button for at least 10 seconds until the device shuts down completely.
- Click System Restore and follow the instructions on the screen to restore your system to an earlier working state.
- If System Restore doesn’t solve the issue, perform a System Scan in Safe Mode by clicking the Recovery tab on the Advanced Options page. Follow the instructions to complete the scan.
- Once you have completed the scan, restart your computer normally and check to see if your issue has been resolved.
Update Windows/MacOS
Take the example of John, a user who plays Steam games on his Windows PC.
Recently, he noticed that some of his favorite titles were no longer launching properly and crashing instead.
To fix this issue, one of the first solutions he tried was to update his operating system (Windows).
Updating your OS can be an effective way to solve problems with game launches.
It’s important to keep up with the latest patches so that any glitches and bugs in the software are fixed; this will help eliminate compatibility issues between different versions of the same program or application.
Additionally, updating your OS regularly ensures you’re getting all the security updates from Microsoft which helps protect against malicious threats such as viruses and malware.
John decided to go ahead and install all available updates for his Windows PC; this resolved the issue he had been having with Steam game launches.
The process took some time but it was worth it – now he could get back into playing without interruption!
Update Windows
Updating Windows can help to solve Steam game launching issues. Here’s how to do it:
- Open the Start menu and type ‘Windows Update’ in the search box.
- Click on ‘Check for updates’ to begin the update process.
- A list of available updates will be displayed and you should select all of them, then click ‘Install updates’.
- After the updates have been installed, restart your computer.
Update macOS
Updating your macOS is an important step to solve any Steam game launching issues. Here’s how you can do it:
- Open Finder > Applications.
- Open the Apple menu and go to System Preferences > Software Update.
- If you see any pending updates, select Update Now to apply any pending system software updates.
Update Drivers
Updating your drivers can help solve the issue of your Steam game not launching.
By ensuring that your system is running the latest software and driver updates, you can help ensure that the game runs as intended.
To check for driver updates:
- Open your device manager.
- Select the device you wish to update.
- Then click ‘Update Driver’.
Updating Your Graphics Card Drivers on Windows 10
To update your graphics card drivers on Windows 10, follow these steps:
- Press the Win R keys (Windows logo key and R key) at the same time to open the Run command.
- Type “devmgmt.msc” and click “OK” to open Device Manager.
- Double-click on the graphics card entry to open its properties.
- Open the Driver tab, and then select Windows Update.
- If no updates are available, right-click on your desktop and select NVIDIA Control Panel from the menu.
- Select Device Manager from the NVIDIA Control Panel window, and then click Drivers tab.
- Check if a new graphics driver is available for your PC, and if so, download it.
- Once downloaded, double-click on the driver file to install it on your PC and restart your computer when prompted to complete the installation process.
Frequently Asked Questions
Why Won’t The Game Start on Steam?
Reasons Why Your Steam Game Won’t Start.
1. You don’t have the necessary permissions to run Steam and the game as an administrator.
2. You have a corrupted download cache in your Steam client.
3. Your installed games are located in the wrong location.
4. Your computer needs to be restarted.
5. The game files need to be verified for integrity.
6. The game hasn’t been updated to the latest version available from Steam.
7. You haven’t installed all of the necessary files for the game to launch properly.
8. You need to check your system for any malware or viruses that could be blocking the game from running correctly.
9. The game is not compatible with your current graphics card or drivers installed on your computer.
10. Your computer is running out of memory and can’t handle running the game at the same time as other applications and processes you have running in the background.
Why Isn’t My Game Opening?
Your games aren’t opening because
1. Restart Your PC or Console: A simple restart can often fix the issue and make your game open.
2. Verify Integrity of Game Files: Corrupted files can prevent your game from launching, so check to make sure all your game files are intact.
3. Update Graphics Card Drivers: Outdated drivers can cause compatibility issues, so make sure they are up-to-date.
4. Reinstall Your Graphics Driver: If driver updates don’t work, try reinstalling the graphics drivers completely.
5. Memory and Processor Mismatch: If you’re running a low-end system, it may not have the power to run a certain game, so check that you meet the minimum requirements for the game.
Why Will My Game Not Load?
If your game won’t load, it could be due to a variety of issues.
The first step is to make sure your browser or plug-ins are up-to-date.
If you’re using Chrome, check for updates and make sure you’re using the latest version.
If you’re still having trouble, try uninstalling and reinstalling the game, or restarting your PC or console.
Lastly, updating your drivers may help resolve any compatibility issues that could be causing the game not to load.
Taking these steps should help you get back in the game in no time!
How Do I Fix Steam Games Not Working on Windows 10?
If your Steam games are not working on Windows 10, there are several steps you can take to try to fix the issue.
First, launch Steam and go to the Library, right-click on the game and select Properties from the menu.
Select the Local Files tab and click the Verify button to make sure all game files are in order.
If this doesn’t help, try killing the process and restarting Steam as an administrator.
If that doesn’t work, you can try uninstalling and reinstalling the game. Also, check the properties for both Steam client and game itself since some games may run in compatibility mode by default.
Finally, make sure your Windows 10 is up-to-date so that it is compatible with your games.
Following these steps should ensure your Steam games are running properly on Windows 10.
How Do I Repair a Steam Game?
Follow these steps to repair your Steam game:
1. Launch the Steam client.
2. Go to the Library tab in Steam and select the game you want to repair.
3. Right-click on the game and select Properties from the menu.
4. Select the Local Files tab and click Verify Integrity of Game Files.
5. Steam will detect any corrupted or missing files and replace them with new ones from its servers.
6. After repair is finished, restart your computer, then launch the game again from Steam to make sure it is working properly.
7. If you still experience issues, try disabling your antivirus temporarily and running the game again from Steam.
How Do I See Steam Processes in the Task Manager Window?
You can follow the steps below:
1. Open the Task Manager window. To do this, press the “Ctrl Alt Delete” keys on your keyboard and choose “Task Manager” from the menu.
2. Click on the “More Details” option at the bottom of the window. This will expand the Task Manager window and show you more information about each process running on your computer.
3. Look for a process named “Steam Client Bootstrapper” in the list of processes. This is the process that runs Steam and is responsible for launching games and other apps in Steam.
4. You can also look for other processes related to Steam such as “Steam Client Service,” “Steam Web Helper,” and “Steam Scheduler.” These processes are all related to Steam and help it run smoothly and efficiently.
5. Once you have identified any of these processes, you can click on it to see more information about it in the Task Manager window, such as its CPU and memory usage, as well as how much network bandwidth it is consuming.
6. You can also right-click on any of these processes and select “End Process Tree” if you want to stop them from running or if they are causing problems with your computer’s performance.
How to Prevent Third-Party Antivirus Software from Blocking Steam Client Updates?
If you’re having trouble updating your Steam client, it could be due to third-party antivirus software blocking the connection.
Here’s how to prevent this from happening:
1. Open your third-party antivirus software and access the settings.
2. Look for the ‘Excluded Files’ or ‘Exclusions’ option and click on it.
3. Add the folder where your Steam client is installed to the list of excluded files/folders.
4. Save the changes you’ve made and try to update your Steam client again.
5. If you are still having problems, try disabling your antivirus software temporarily to see if that helps.
6. If that doesn’t work, try uninstalling and reinstalling your antivirus software or switching to a different one that is more compatible with Steam updates.
What Is the Default Location of the Steamapps Folder?
If you’re a Steam user, you’ll want to know where your Steamapps folder is located. This folder stores all your games and other data related to your account.
You can find the default location of the Steamapps folder in two easy steps.
First, open File Explorer on your computer. The default location for the Steamapps folder is either in your personal documents folder or in the game’s master folder in the Steam games directory.
Second, go to the Steam installation directory. By default, this is C:Program Files (x86)Steam.
Inside this directory, you’ll find folders like steamapps and userdata. Your Steamapps folder will be inside one of these folders.
That’s it! Now you know where to find your Steamapps folder and all of its contents.
What is the Steam Client Bootstrapper?
The Steam Client Bootstrapper is an essential part of the Steam Client, the software front-end for the Steam online gaming platform.
It runs in the background and is responsible for downloading and replacing any missing files and also downloading and installing updates.
The process is known as “Steam.exe” and should not take up too many CPU resources on your computer.
To ensure that your Steam Client Bootstrapper is running correctly, you can go to your Task Manager and check that it is listed under the Processes tab.
If it isn’t, you can right-click on the Windows Taskbar and select Task Manager, then select the Processes tab and scroll down until you find it.
If it is listed there, you can be sure that your Steam Client Bootstrapper is working correctly.
You can also check whether your Steam Client Bootstrapper is up-to-date by going to the Settings tab in the Steam Client.
Under Settings, select Downloads & Updates and then click on Check for Updates.
This will check whether there are any available updates to your Steam Client Bootstrapper process and download them if needed.
Finally, if your Steam Client Bootstrapper isn’t running properly or if you experience any difficulties with it, you can try restarting your computer as this might help solve any issues with the process.
You can also try reinstalling or updating your version of the Steam client, which may help if you are having problems with the Steam Client Bootstrapper.
What is the Process for Restarting Steam?
Restarting Steam is easy and quick to do.
To begin, open the Steam app on your PC.
Then, click the Steam button in the top left of the application and select Exit.
You may also need to go to the processes list and end any tasks related to the Steam app.
Lastly, press the Windows key and then type ‘Steam’ in the search bar to restart it.
Once you have done this, you should be able to open Steam again without any issues.
Why is Steam Not Working on Windows 11?
If you are having trouble getting Steam to work on Windows 11, there are several steps you can take to try and solve the issue.
First, restart Windows and then run both Steam and the game as an administrator.
If that doesn’t work, you can try killing the app process and restarting the system.
Finally, make sure to update Windows in order to ensure that all of your files are up to date.
Sometimes Steam may not be working due to outdated files or software. By taking these steps, you should be able to get Steam working on Windows 11.
Steam Preparing to Launch Then Nothing. What To Do?
If your Steam games won’t start and you’re stuck at a “Preparing to Launch,” there are a few steps you can take to try and fix the issue.
First, restart your computer and relaunch Steam.
If this doesn’t work, try verifying the integrity of game files.
To do this, click Start > Settings > Update & Security > Troubleshoot > Windows Store Apps > Run the troubleshooter.
This will scan and repair any corrupt files that might be causing the issue.
If this doesn’t work, you can try repairing corrupt files of your system by using System File Checker (SFC).
To use SFC, open Command Prompt as an administrator, type in “sfc/scannow” and press enter.
This will scan your system for corrupt files and repair them if needed.
Finally, if none of these solutions work, you may need to reinstall the game to resolve the issue.
Windows 7 Steam Games Not Launching. What To Do?
If you are having trouble launching Steam games on Windows 7, there are a few steps you can take to try and resolve the issue.
First, you should restart your computer and launch Steam from the installation folder rather than from a pre-existing shortcut.
Second, delete the ClientRegistry.blob file located in the Steam directory.
Finally, you may need to move your installed games to a different location or verify the game files integrity through Steam’s built-in tool.
If these steps do not resolve the issue, you may need to try reinstalling Steam or contact technical support for further assistance.
Steam Games Not Launching Linux. What To Do?
If you’re trying to launch a steam game on Linux, and it’s not working, there are a few steps you can take to troubleshoot the issue.
First, check that your graphics card drivers are up to date.
If this doesn’t solve the issue, try verifying the integrity of the game files by right clicking on it in your library and selecting Properties > Local Files > Verify Integrity of Game Files.
If this doesn’t work, try disabling Steam Overlay from Properties > General > Enable Developer Console.
Additionally, try running the game in compatibility mode for different versions of Linux.
Finally, if none of these steps work, contact Steam Support for further assistance.
Conclusion
When a Steam game won’t launch, it can be a frustrating experience.
However, there are many steps you can take to hopefully get the game up and running again.
By checking that your computer meets all of the requirements for the game, restarting your device, force-quitting the game in question and trying offline mode, moving to another location or updating Windows/macOS may help solve this issue.
If these troubleshooting techniques don’t work, applying pending updates or running the game as an administrator along with compatibility mode could do the trick.
It might feel like you’re hitting a wall but by taking proactive measures you should eventually find success.
By being persistent and following some simple tips outlined above, you’ll soon be back on track playing your favorite games without any further hiccups.
So don’t let technical difficulties stand in your way – start getting creative with potential solutions and have fun gaming!
You Can Also Read How to Refund a Steam Game?


![Why Does Twitter Keep Logging Me Out? Try These Fixes [Solved]](https://gizdox.com/wp-content/uploads/2023/04/Why-Does-Twitter-Keep-Logging-Me-Out_.jpeg)
![How to Chromecast Soap2day in 2023 [Step-by-Step Guide]](https://gizdox.com/wp-content/uploads/2023/02/How-to-Chromecast-Soap2day.jpeg)